
A flower pot water fountain is a simple way to add movement and gentle water sound to a garden without building a permanent pond. It can work in a small patio corner, beside a porch, near an outdoor seating area, or between container plants.
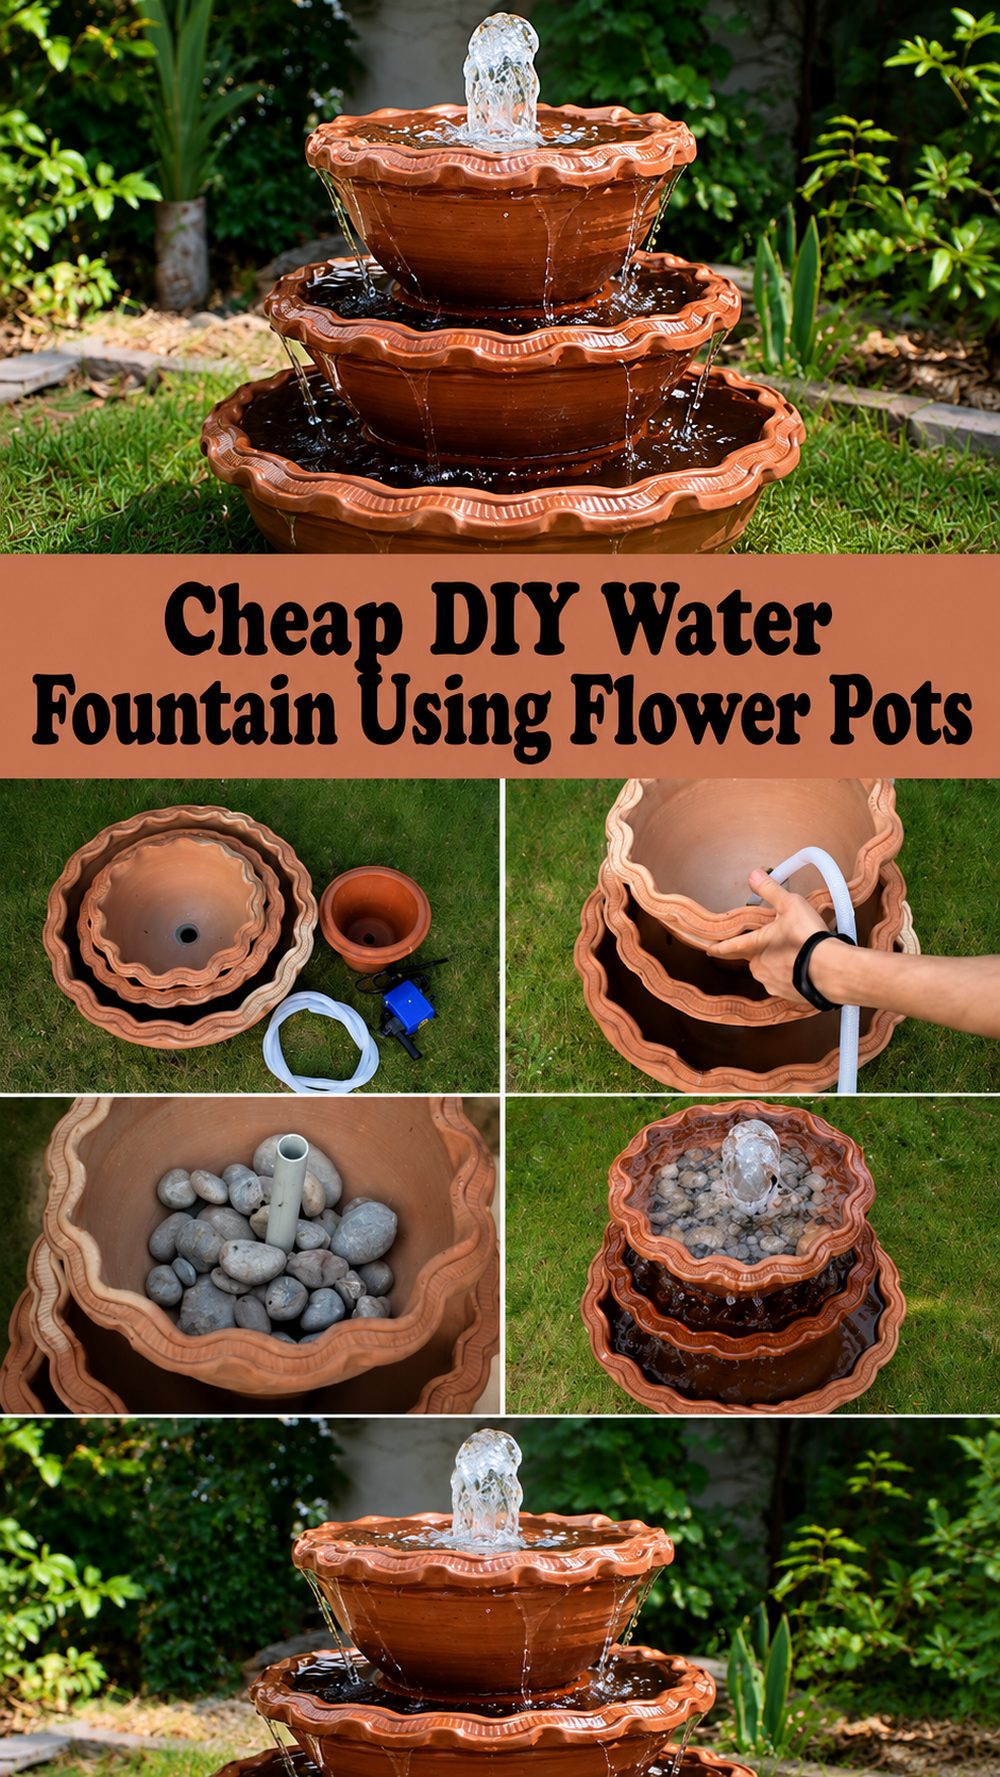
The best version is not the one with the most decorations. A good fountain needs a stable base, enough water around the pump, a clear return path, and pots that will stay balanced when wet.
What You Need
- One large waterproof container for the reservoir
- Two or three sturdy flower pots
- Small submersible fountain pump
- Flexible tubing that fits the pump outlet
- Smooth river stones or decorative pebbles
- Pot supports or sturdy risers
- Outdoor-rated electrical supply where required
- Clean water
- Optional plants and garden decorations
Choose the Right Pots
Terracotta gives a warm cottage-garden look, but some unglazed pots absorb water. Glazed ceramic, resin, concrete-look planters, or other water-resistant containers can be easier to maintain.
Before building the fountain, fill any pot you plan to use as a reservoir and leave it for a while to check for leaks.
Avoid badly cracked containers or narrow top-heavy pots.

Step 1: Choose a Level Location
Pick a flat surface where a little splashing will not damage flooring or furniture.
A fountain beside a seating area is usually more enjoyable than one hidden at the far end of a garden because you can actually hear the water.
Avoid placing it directly beneath trees that constantly drop leaves into the reservoir.
Step 2: Create the Reservoir
Place the largest waterproof pot or basin at the bottom.
The reservoir needs enough water depth to keep the pump submerged according to the pump manufacturer’s instructions.
Do not choose such a small reservoir that you have to refill it constantly.
Step 3: Position the Pump
Place the pump near the center or rear of the reservoir.
Connect the tubing before covering the pump with decorative stones. Keep the pump accessible because you will eventually need to remove and clean it.
Never permanently bury the pump underneath layers of glued stones.
Step 4: Build the Upper Levels
Use stable supports to raise the second and third pots.
Before adding water, gently test the arrangement from different directions. Nothing should wobble.
The top pot should guide water toward the reservoir instead of sending it onto the floor.
Step 5: Route the Tubing
Run the tubing from the pump to the uppermost water outlet.
Keep bends gentle. A sharply kinked tube can reduce flow.
Hide the tube behind pots or stones only after you have confirmed that the system works.
Step 6: Test Before Decorating
Fill the reservoir and start the pump.
Watch the fountain for several minutes.
Check:
- Does all the water return to the reservoir?
- Is the pump fully covered?
- Is water splashing outside?
- Are the pots stable?
- Is the flow too strong?
A fountain with a gentle flow often loses less water to splashing than one with an aggressive waterfall.
Step 7: Finish the Design
Once everything works, add stones around visible supports and tubing.
Try river pebbles for a natural look, pale gravel for a clean modern design, or dark stone against terracotta for stronger contrast.
Small plants around the fountain can soften the edges, but keep roots and loose soil away from the pump.
How to Fix Common Problems
Water splashes out: Lower the flow or adjust the angle of the upper pot.
Pump sounds noisy: Check that it is fully submerged and not touching the container in a way that causes vibration.
Water flow becomes weak: Clean debris from the pump intake and inspect the tubing for kinks.
Water disappears quickly: Look for leaks and excessive splashing before assuming evaporation is responsible.
Water becomes dirty: Remove leaves and debris and refresh the water as needed.
Maintenance
Check the water level regularly. Small fountains can lose water surprisingly quickly in hot or windy weather.
Clean the pump intake before debris builds up. Mineral deposits can also collect on pots and stones, especially in hard-water areas.
During freezing weather, follow the pump manufacturer’s storage instructions and protect pots that can crack when water freezes inside them.
Safety Notes
Use electrical equipment intended for the location and follow its manufacturer instructions. Keep plugs and connections protected from water. Electrical work around outdoor water should be handled properly rather than improvised.
Children should also be supervised around water features. CPSC includes decorative ponds and fountains among household water hazards and recommends active supervision around water.
FAQs
Can I make this without electricity?
Solar fountain pumps are available, although performance depends on the product and sunlight conditions.
Can I use terracotta pots?
Yes, but test them because unglazed terracotta may absorb or seep water.
How big should the fountain be?
Choose a size that leaves enough reservoir capacity for the pump while fitting comfortably in your available space.
Can I keep plants inside the fountain?
Some water-friendly plants can work, but they should not block the pump intake.
How often should I refill it?
Check regularly instead of following a fixed schedule because evaporation and splashing vary with weather and fountain size.
Final Thoughts
A flower pot fountain works best when you treat water flow and maintenance as part of the design. Build the stable working fountain first, then hide the practical parts with stones and plants.